Amazon SageMaker Operators for Kubernetes
Amazon SageMaker Operators for Kubernetes make it easier for developers and data scientists using Kubernetes to train, tune, and deploy machine learning (ML) models in Amazon SageMaker. You can install these SageMaker Operators on your Kubernetes cluster in Amazon Elastic Kubernetes Service (EKS) to create SageMaker jobs natively using the Kubernetes API and command-line Kubernetes tools such as ‘kubectl’. This guide shows you how to set up the operators. The guide also explains how to use the operators to run model training, hyperparameter tuning, and inference (real-time and batch).
There is no additional charge to use these operators. You do incur charges for any Amazon SageMaker resources that you use through these operators. The procedures and guidelines here assume you are familiar with Kubernetes and its basic commands.
Contents
What is an operator?
Kubernetes is built on top of what is called the controller pattern.
This pattern allows applications and tools to listen to a central state
manager (ETCD) and act when something happens. Examples of such
applications
include cloud-controller-manager and controller-manager.
The controller pattern allows you to create decoupled experiences and not
have to worry about how other components are integrated. To add new capabilities to Kubernetes, developers can extend the Kubernetes API by creating a custom resource that contains their application-specific or domain-specific logic and components. Operators in Kubernetes allow users to natively invoke these custom resources and automate associated workflows.
Prerequisites
This guide assumes that you’ve completed the following prerequisites:
Installed the following tools on the client machine used to access your k8s cluster:
kubectl Version 1.13 or later. Use a
kubectlversion that is within one minor version of your Amazon Elastic Kubernetes Service (Amazon EKS) cluster control plane. For example, a 1.13kubectlclient works with Kubernetes 1.13 and 1.14 clusters. OpenID Connect (OIDC) is not supported in versions earlier than 1.13.eksctl Version 0.7.0 or later
AWS CLI Version 1.16.232 or later
(optional) Helm Version 3.0 or later
Have IAM permissions to create roles and attach policies to roles.
Created a Kubernetes cluster to run the operators on. It should either be Kubernetes version 1.13 or 1.14. For automated cluster creation using
eksctl, see Getting Started with eksctl. It takes 20 to 30 minutes to provision a cluster.
Permissions overview
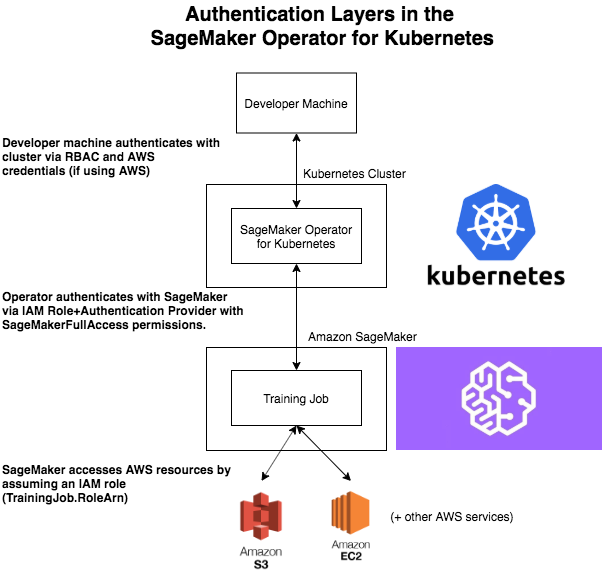
The Amazon SageMaker Operators for Kubernetes allow you to manage jobs in Amazon SageMaker from your Kubernetes cluster. Thus the operators will access Amazon SageMaker resources on your behalf. The IAM role that the operator assumes to interact with AWS resources differs from the credentials you use to access the Kubernetes cluster. The role also differs from the role that Amazon SageMaker assumes when running your machine learning jobs. The following image explains this design and flow.
IAM role-based setup and operator deployment
The following sections describe the steps to setup and deploy the operator.
Cluster-scoped deployment
Before you can deploy your operator using an IAM role, associate an OpenID Connect (OIDC) provider with your role to authenticate with the IAM service.
Create an OpenID Connect Provider for Your Cluster
The following instruction will create and associate an OIDC provider with your EKS cluster.
Set the local CLUSTER_NAME and AWS_REGION environment
variables as follows:
# Set the Region and cluster
export CLUSTER_NAME="<your cluster name>"
export AWS_REGION="<your region>"
Use the following command to associate the OIDC provider with your cluster. For more information, see Enabling IAM Roles for Service Accounts on your Cluster.
eksctl utils associate-iam-oidc-provider --cluster ${CLUSTER_NAME} \
    --region ${AWS_REGION} --approve
Your output should look like the following:
[_]  eksctl version 0.10.1
[_]  using region us-east-1
[_]  IAM OpenID Connect provider is associated with cluster "my-cluster" in "us-east-1"
Now that the cluster has an OIDC identity provider, you can create a role and give a Kubernetes ServiceAccount permission to assume the role.
Get the OIDC ID
To set up the ServiceAccount, first obtain the OpenID Connect issuer URL using the following command:
aws eks describe-cluster --name ${CLUSTER_NAME} --region ${AWS_REGION} \
    --query cluster.identity.oidc.issuer --output text
The command will return a URL like the following:
https://oidc.eks.${AWS_REGION}.amazonaws.com/id/D48675832CA65BD10A532F597OIDCID
In this URL, the value D48675832CA65BD10A532F597OIDCID is the OIDC ID. The OIDC ID for your cluster will be different. You need this OIDC ID value to create a role.
If your output is None, it means that your client version is old.
To work around this, run the following command:
aws eks describe-cluster --query cluster --name ${CLUSTER_NAME} --output text | grep OIDC
The OIDC URL will be returned as follows:
OIDC https://oidc.eks.us-east-1.amazonaws.com/id/D48675832CA65BD10A532F597OIDCID
Create an IAM Role
Create a file named trust.json and insert the following trust
relationship code block into it. Be sure to replace all <OIDC ID>, <AWS account number>, and <EKS Cluster region> placeholders with values corresponding to your cluster.
{
  "Version": "2012-10-17",
  "Statement": [
    {
      "Effect": "Allow",
      "Principal": {
        "Federated": "arn:aws:iam::<AWS account number>:oidc-provider/oidc.eks.<EKS Cluster region>.amazonaws.com/id/<OIDC ID>"
      },
      "Action": "sts:AssumeRoleWithWebIdentity",
      "Condition": {
        "StringEquals": {
          "oidc.eks.<EKS Cluster region>.amazonaws.com/id/<OIDC ID>:aud": "sts.amazonaws.com",
          "oidc.eks.<EKS Cluster region>.amazonaws.com/id/<OIDC ID>:sub": "system:serviceaccount:sagemaker-k8s-operator-system:sagemaker-k8s-operator-default"
        }
      }
    }
  ]
}
Run the following command to create a role with the trust
relationship defined in trust.json. This role enables the
Amazon EKS cluster to get and refresh credentials from IAM.
aws iam create-role --role-name <role name> --assume-role-policy-document file://trust.json --output=text
Your output should look like the following:
ROLE    arn:aws:iam::123456789012:role/my-role 2019-11-22T21:46:10Z    /       ABCDEFSFODNN7EXAMPLE   my-role
ASSUMEROLEPOLICYDOCUMENT        2012-10-17
STATEMENT       sts:AssumeRoleWithWebIdentity   Allow
STRINGEQUALS    sts.amazonaws.com       system:serviceaccount:sagemaker-k8s-operator-system:sagemaker-k8s-operator-default
PRINCIPAL       arn:aws:iam::123456789012:oidc-provider/oidc.eks.us-east-1.amazonaws.com/id/
Take note of ROLE ARN, you pass this value to your
operator.
Attach the AmazonSageMakerFullAccess Policy to the Role
To give the role access to Amazon SageMaker, attach the AmazonSageMakerFullAccess policy. If you want to limit permissions to the operator, you can create your own custom policy and attach it.
To attach AmazonSageMakerFullAccess, run the following command:
aws iam attach-role-policy --role-name <role name> --policy-arn arn:aws:iam::aws:policy/AmazonSageMakerFullAccess
The Kubernetes
ServiceAccount sagemaker-k8s-operator-default should
have AmazonSageMakerFullAccess permissions. Confirm this when you
install the operator.
Deploy the Operator
When deploying your operator, you can use either a YAML file or Helm charts.
Deploy the Operator Using YAML
This is the simplest way to deploy your operators. The process is as follows:
Download the installer script using the following command:
wget https://raw.githubusercontent.com/aws/amazon-sagemaker-operator-for-k8s/master/release/rolebased/installer.yaml
Edit the
installer.yamlfile to replaceeks.amazonaws.com/role-arn. Replace the ARN here with the Amazon Resource Name (ARN) for the OIDC-based role you’ve created.Use the following command to deploy the cluster:
kubectl apply -f installer.yaml
Deploy the Operator Using Helm Charts
Use the provided Helm Chart to install the operator.
Clone the Helm installer directory using the following command:
git clone https://github.com/aws/amazon-sagemaker-operator-for-k8s.git
Navigate to the
amazon-sagemaker-operator-for-k8s/hack/charts/installer folder. Edit
the rolebased/values.yaml file, which includes high-level parameters for the
Chart. Replace the role ARN here with the Amazon Resource Name (ARN) for the OIDC-based role you’ve
created.
Install the Helm Chart using the following command:
kubectl create namespace sagemaker-k8s-operator-system
helm install --namespace sagemaker-k8s-operator-system sagemaker-operator rolebased/
Warning
If you decide to install the operator into a namespace other than the one specified above,
you will need to adjust the namespace defined in the IAM role trust.json file to match.
After a moment, the chart will be installed with a randomly generated name. Verify that the installation succeeded by running the following command:
helm ls
Your output should look like the following:
NAME                    NAMESPACE                       REVISION        UPDATED                                 STATUS          CHART                           APP VERSION
sagemaker-operator      sagemaker-k8s-operator-system   1               2019-11-20 23:14:59.6777082 +0000 UTC   deployed        sagemaker-k8s-operator-0.1.0
Verify the operator deployment
You should be able to see the Amazon SageMaker Custom Resource Definitions (CRDs) for each operator deployed to your cluster by running the following command:
kubectl get crd | grep sagemaker
Your output should look like the following:
batchtransformjobs.sagemaker.aws.amazon.com         2019-11-20T17:12:34Z
endpointconfigs.sagemaker.aws.amazon.com            2019-11-20T17:12:34Z
hostingdeployments.sagemaker.aws.amazon.com         2019-11-20T17:12:34Z
hyperparametertuningjobs.sagemaker.aws.amazon.com   2019-11-20T17:12:34Z
models.sagemaker.aws.amazon.com                     2019-11-20T17:12:34Z
trainingjobs.sagemaker.aws.amazon.com               2019-11-20T17:12:34Z
Ensure that the operator pod is running successfully. Use the following command to list all pods:
kubectl -n sagemaker-k8s-operator-system get pods
You should see a pod
named sagemaker-k8s-operator-controller-manager-***** in the
namespace sagemaker-k8s-operator-system as follows:
NAME                                                         READY   STATUS    RESTARTS   AGE
sagemaker-k8s-operator-controller-manager-12345678-r8abc     2/2     Running   0          23s
Namespace-scoped deployment
You have the option to install your operator within the scope of an individual Kubernetes namespace. In this mode, the controller will only monitor and reconcile resources with Amazon SageMaker if the resources are created within that namespace. This allows for finer grained control over which controller is managing which resources. This is useful for deploying to multiple AWS accounts or controlling which users have access to particular jobs.
This guide outlines how to install an operator into a particular, predefined namespace. To deploy a controller into a second namespace, follow the guide from beginning to end and change out the namespace in each step.
Create an OpenID Connect Provider for Your EKS Cluster
The following instruction will create and associate an OIDC provider with your EKS cluster.
Set the local CLUSTER_NAME and AWS_REGION environment
variables as follows:
# Set the region and cluster
export CLUSTER_NAME="<your cluster name>"
export AWS_REGION="<your region>"
Use the following command to associate the OIDC provider with your cluster. For more information, see Enabling IAM Roles for Service Accounts on your Cluster.
eksctl utils associate-iam-oidc-provider --cluster ${CLUSTER_NAME} \
    --region ${AWS_REGION} --approve
Your output should look like the following:
[_]  eksctl version 0.10.1
[_]  using region us-east-1
[_]  IAM OpenID Connect provider is associated with cluster "my-cluster" in "us-east-1"
Now that the cluster has an OIDC identity provider, you can create a role and give a Kubernetes ServiceAccount permission to assume the role.
Get your OIDC ID
To set up the ServiceAccount, first obtain the OpenID Connect issuer URL using the following command:
aws eks describe-cluster --name ${CLUSTER_NAME} --region ${AWS_REGION} \
    --query cluster.identity.oidc.issuer --output text
The command will return a URL like the following:
https://oidc.eks.${AWS_REGION}.amazonaws.com/id/D48675832CA65BD10A532F597OIDCID
In this URL, the value D48675832CA65BD10A532F597OIDCID is the OIDC ID. The OIDC ID for your cluster will be different. You need this OIDC ID value to create a role.
If your output is None, it means that your client version is old.
To work around this, run the following command:
aws eks describe-cluster --query cluster --name ${CLUSTER_NAME} --output text | grep OIDC
The OIDC URL will be returned as follows:
OIDC https://oidc.eks.us-east-1.amazonaws.com/id/D48675832CA65BD10A532F597OIDCID
Create your IAM Role
Create a file named trust.json and insert the following trust
relationship code block into it. Be sure to replace all <OIDC ID>, <AWS account number>, <EKS Cluster region>, and <Namespace> placeholders with values corresponding to your cluster. For the purposes of this guide, my-namespace is used for the <Namespace> value.
{
  "Version": "2012-10-17",
  "Statement": [
    {
      "Effect": "Allow",
      "Principal": {
        "Federated": "arn:aws:iam::<AWS account number>:oidc-provider/oidc.eks.<EKS Cluster region>.amazonaws.com/id/<OIDC ID>"
      },
      "Action": "sts:AssumeRoleWithWebIdentity",
      "Condition": {
        "StringEquals": {
          "oidc.eks.<EKS Cluster region>.amazonaws.com/id/<OIDC ID>:aud": "sts.amazonaws.com",
          "oidc.eks.<EKS Cluster region>.amazonaws.com/id/<OIDC ID>:sub": "system:serviceaccount:<Namespace>:sagemaker-k8s-operator-default"
        }
      }
    }
  ]
}
Run the following command to create a role with the trust
relationship defined in trust.json. This role enables the
Amazon EKS cluster to get and refresh credentials from IAM.
aws iam create-role --role-name <role name> --assume-role-policy-document file://trust.json --output=text
Your output should look like the following:
ROLE    arn:aws:iam::123456789012:role/my-role 2019-11-22T21:46:10Z    /       ABCDEFSFODNN7EXAMPLE   my-role
ASSUMEROLEPOLICYDOCUMENT        2012-10-17
STATEMENT       sts:AssumeRoleWithWebIdentity   Allow
STRINGEQUALS    sts.amazonaws.com       system:serviceaccount:my-namespace:sagemaker-k8s-operator-default
PRINCIPAL       arn:aws:iam::123456789012:oidc-provider/oidc.eks.us-east-1.amazonaws.com/id/
Take note of ROLE ARN, you pass this value to your
operator.
Attach the AmazonSageMakerFullAccess Policy to your Role
To give the role access to Amazon SageMaker, attach the AmazonSageMakerFullAccess policy. If you want to limit permissions to the operator, you can create your own custom policy and attach it.
To attach AmazonSageMakerFullAccess, run the following command:
aws iam attach-role-policy --role-name <role name> --policy-arn arn:aws:iam::aws:policy/AmazonSageMakerFullAccess
The Kubernetes
ServiceAccount sagemaker-k8s-operator-default should
have AmazonSageMakerFullAccess permissions. Confirm this when you
install the operator.
Deploy the Operator to Your Namespace
When deploying your operator, you can use either a YAML file or Helm charts.
Deploy the Operator to Your Namespace Using YAML
There are two parts to deploying an operator within the scope of a namespace. The first is the set of CRDs that are installed at a cluster level. These resource definitions only need to be installed once per Kubernetes cluster. The second part is the operator permissions and deployment itself.
If you have not already installed the CRDs into the cluster, apply the CRD installer YAML using the following command:
kubectl apply -f https://raw.githubusercontent.com/aws/amazon-sagemaker-operator-for-k8s/master/release/rolebased/namespaced/crd.yaml
To install the operator onto the cluster:
Download the operator installer YAML using the following command:
wget https://raw.githubusercontent.com/aws/amazon-sagemaker-operator-for-k8s/master/release/rolebased/namespaced/operator.yaml
Update the installer YAML to place the resources into your specified namespace using the following command:
sed -i -e 's/PLACEHOLDER-NAMESPACE/<YOUR NAMESPACE>/g' operator.yaml
Edit the
operator.yamlfile to place resources into youreks.amazonaws.com/role-arn. Replace the ARN here with the Amazon Resource Name (ARN) for the OIDC-based role you’ve created.Use the following command to deploy the cluster:
kubectl apply -f operator.yaml
Deploy the Operator to Your Namespace Using Helm Charts
There are two parts needed to deploy an operator within the scope of a namespace. The first is the set of CRDs that are installed at a cluster level. These resource definitions only need to be installed once per Kubernetes cluster. The second part is the operator permissions and deployment itself. When using helm charts you will have to first create the namespace using kubectl.
Clone the Helm installer directory using the following command:
git clone https://github.com/aws/amazon-sagemaker-operator-for-k8s.git
Navigate to the
amazon-sagemaker-operator-for-k8s/hack/charts/installer/namespaced folder. Edit
the rolebased/values.yaml file, which includes high-level parameters for the
Chart. Replace the role ARN here with the Amazon Resource Name (ARN) for the OIDC-based role you’ve
created.
Install the Helm Chart using the following command:
helm install crds crd_chart/
Create the required namespace and install the operator using the following command:
kubectl create namespace <namespace>
helm install --n <namespace> op operator_chart/
After a moment, the chart will be installed with the
name sagemaker-operator. Verify that the installation succeeded by running the following
command:
helm ls
Your output should look like the following:
NAME                    NAMESPACE                       REVISION        UPDATED                                 STATUS          CHART                           APP VERSION
sagemaker-operator      my-namespace                    1               2019-11-20 23:14:59.6777082 +0000 UTC   deployed        sagemaker-k8s-operator-0.1.0
Verify the operator deployment to your namespace
You should be able to see the Amazon SageMaker Custom Resource Definitions (CRDs) for each operator deployed to your cluster by running the following command:
kubectl get crd | grep sagemaker
Your output should look like the following:
batchtransformjobs.sagemaker.aws.amazon.com         2019-11-20T17:12:34Z
endpointconfigs.sagemaker.aws.amazon.com            2019-11-20T17:12:34Z
hostingdeployments.sagemaker.aws.amazon.com         2019-11-20T17:12:34Z
hyperparametertuningjobs.sagemaker.aws.amazon.com   2019-11-20T17:12:34Z
models.sagemaker.aws.amazon.com                     2019-11-20T17:12:34Z
trainingjobs.sagemaker.aws.amazon.com               2019-11-20T17:12:34Z
Ensure that the operator pod is running successfully. Use the following command to list all pods:
kubectl -n my-namespace get pods
You should see a pod
named sagemaker-k8s-operator-controller-manager-***** in the
namespace my-namespace as follows:
NAME                                                         READY   STATUS    RESTARTS   AGE
sagemaker-k8s-operator-controller-manager-12345678-r8abc     2/2     Running   0          23s
Install the Amazon SageMaker logs kubectl plugin
As part of the Amazon SageMaker Operators for Kubernetes, you can use
the smlogs plugin for kubectl .
This enables Amazon SageMaker CloudWatch logs to be streamed
with kubectl. kubectl must be installed onto
your PATH. The
following commands place the binary in
the sagemaker-k8s-bin directory in your home directory, and add
that directory to your PATH.
export os="linux"

wget https://amazon-sagemaker-operator-for-k8s-us-east-1.s3.amazonaws.com/kubectl-smlogs-plugin/v1/${os}.amd64.tar.gz
tar xvzf ${os}.amd64.tar.gz

# Move binaries to a directory in your homedir.
mkdir ~/sagemaker-k8s-bin
cp ./kubectl-smlogs.${os}.amd64/kubectl-smlogs ~/sagemaker-k8s-bin/.

# This line will add the binaries to your PATH in your .bashrc.

echo 'export PATH=$PATH:~/sagemaker-k8s-bin' >> ~/.bashrc

# Source your .bashrc to update environment variables:
source ~/.bashrc
Use the following command to verify that the kubectl plugin is
installed correctly:
kubectl smlogs
If the kubectl plugin is installed correctly, your output should
look like the following:
View Amazon SageMaker logs via Kubernetes

Usage:
  smlogs [command]

Aliases:
  smlogs, SMLogs, Smlogs

Available Commands:
  BatchTransformJob       View BatchTransformJob logs via Kubernetes
  TrainingJob             View TrainingJob logs via Kubernetes
  help                    Help about any command

Flags:
  -h, --help   help for smlogs

Use "smlogs [command] --help" for more information about a command.
Delete operators
Delete cluster-based operators
Operators installed using YAML
To uninstall the operator from your cluster, make sure that all
Amazon SageMaker resources have been deleted from the cluster. Failure
to do so will cause the operator delete operation to hang. Once you have
deleted all Amazon SageMaker jobs, use kubectl to
delete the operator from the cluster. Run the following commands to stop
all jobs and delete the operator from the cluster:
# Delete all Amazon SageMaker jobs from Kubernetes
kubectl delete --all --all-namespaces hyperparametertuningjob.sagemaker.aws.amazon.com
kubectl delete --all --all-namespaces trainingjobs.sagemaker.aws.amazon.com
kubectl delete --all --all-namespaces batchtransformjob.sagemaker.aws.amazon.com
kubectl delete --all --all-namespaces hostingdeployment.sagemaker.aws.amazon.com

# Delete the operator and its resources
kubectl delete -f /installer.yaml
You should see output like the following:
$ kubectl delete --all --all-namespaces trainingjobs.sagemaker.aws.amazon.com
trainingjobs.sagemaker.aws.amazon.com "xgboost-mnist-from-for-s3" deleted

$ kubectl delete --all --all-namespaces hyperparametertuningjob.sagemaker.aws.amazon.com
hyperparametertuningjob.sagemaker.aws.amazon.com "xgboost-mnist-hpo" deleted

$ kubectl delete --all --all-namespaces batchtransformjob.sagemaker.aws.amazon.com
batchtransformjob.sagemaker.aws.amazon.com "xgboost-mnist" deleted

$ kubectl delete --all --all-namespaces hostingdeployment.sagemaker.aws.amazon.com
hostingdeployment.sagemaker.aws.amazon.com "host-xgboost" deleted

$ kubectl delete -f raw-yaml/installer.yaml
namespace "sagemaker-k8s-operator-system" deleted
customresourcedefinition.apiextensions.k8s.io "batchtransformjobs.sagemaker.aws.amazon.com" deleted
customresourcedefinition.apiextensions.k8s.io "endpointconfigs.sagemaker.aws.amazon.com" deleted
customresourcedefinition.apiextensions.k8s.io "hostingdeployments.sagemaker.aws.amazon.com" deleted
customresourcedefinition.apiextensions.k8s.io "hyperparametertuningjobs.sagemaker.aws.amazon.com" deleted
customresourcedefinition.apiextensions.k8s.io "models.sagemaker.aws.amazon.com" deleted
customresourcedefinition.apiextensions.k8s.io "trainingjobs.sagemaker.aws.amazon.com" deleted
role.rbac.authorization.k8s.io "sagemaker-k8s-operator-leader-election-role" deleted
clusterrole.rbac.authorization.k8s.io "sagemaker-k8s-operator-manager-role" deleted
clusterrole.rbac.authorization.k8s.io "sagemaker-k8s-operator-proxy-role" deleted
rolebinding.rbac.authorization.k8s.io "sagemaker-k8s-operator-leader-election-rolebinding" deleted
clusterrolebinding.rbac.authorization.k8s.io "sagemaker-k8s-operator-manager-rolebinding" deleted
clusterrolebinding.rbac.authorization.k8s.io "sagemaker-k8s-operator-proxy-rolebinding" deleted
service "sagemaker-k8s-operator-controller-manager-metrics-service" deleted
deployment.apps "sagemaker-k8s-operator-controller-manager" deleted
secrets "sagemaker-k8s-operator-abcde" deleted
Operators installed using Helm Charts
To delete the operator CRDs, first delete all the running jobs. Then delete the helm chart that was used to deploy the operators using the following commands:
# get the helm charts
$ helm ls

# delete the charts
$ helm delete <chart name>
Delete namespace-based operators
Operators installed with YAML
To uninstall the operator from your cluster, make sure that all
Amazon SageMaker resources have been deleted from the cluster. Failure
to do so will cause the operator delete operation to hang. Once you have
deleted all Amazon SageMaker jobs, use kubectl to first delete the operator from the namespace and then the CRDs from the cluster. Run the following commands to stop
all jobs and delete the operator from the cluster:
# Delete all Amazon SageMaker jobs from Kubernetes
kubectl delete --all --all-namespaces hyperparametertuningjob.sagemaker.aws.amazon.com
kubectl delete --all --all-namespaces trainingjobs.sagemaker.aws.amazon.com
kubectl delete --all --all-namespaces batchtransformjob.sagemaker.aws.amazon.com
kubectl delete --all --all-namespaces hostingdeployment.sagemaker.aws.amazon.com
# Delete the operator using the same yaml file that was used to install the operator
kubectl delete -f operator.yaml

# Now delete the CRDs using the CRD installer yaml
kubectl delete -f https://raw.githubusercontent.com/aws/amazon-sagemaker-operator-for-k8s/master/release/rolebased/namespaced/crd.yaml

# Now you can delete the namespace if you want
kubectl delete namespace <namespace>
Operators installed with Helm Charts
To delete the operator CRDs, first delete all the running jobs. Then delete the helm chart that was used to deploy the operators using the following commands:
# Delete the operator
$ helm delete -n <namespace> op

# delete the crds
$ helm delete crds

# optionally delete the namespace
$ kubectl delete namespace <namespace>
Troubleshooting
Debugging a Failed Job
Check the job status by running:
kubectl get <CRD Type> <job name>
If the job was created in Amazon SageMaker, you can use the following
command to see the STATUS and the SageMaker Job Name:
kubectl get <crd type> <job name>
You can use
smlogsto find the cause of the issue using the following command:kubectl smlogs <crd type> <job name>
You can also use the
describecommand to get more details about the job using the following command.The output will have anadditionalfield that will have more information about the status of the job.kubectl describe <crd type> <job name>
If the job was not created in Amazon SageMaker, then use the logs of the operator’s pod to find the cause of the issue as follows:
$ kubectl get pods -A | grep sagemaker
# Output:
sagemaker-k8s-operator-system   sagemaker-k8s-operator-controller-manager-5cd7df4d74-wh22z   2/2     Running   0          3h33m

$ kubectl logs -p <pod name> -c manager -n sagemaker-k8s-operator-system
Deleting an Operator CRD
If deleting a job is stuck, check if the operator is running. If the operator is not running, then you will have to delete the finalizer using the following steps:
In a new terminal, open the job in an editor using
kubectl editas follows:$ kubectl edit <crd type> <job name> # for example for the batchtransformjob xgboost-mnist $ kubectl edit batchtransformjobs xgboost-mnist
Edit the job to delete the finalizer by removing the following two lines from the file. Save the file and the job should immediately get deleted/updated.
finalizers:
- sagemaker-operator-finalizer
Images and SMlogs in each Region
The following table lists the available operator images and SMLogs in each region.
Region |
Controller Image |
Linux SMLogs |
|---|---|---|
us-east-1 |
|
|
us-east-2 |
|
|
us-west-2 |
|
|
eu-west-1 |
|
Using Amazon Sagemaker Jobs
To run a job using the Amazon Sagemaker Operators for Kubernetes, you can either apply a YAML file or use the supplied Helm charts.
All operator sample jobs in the following tutorials use sample data taken from a public MNIST dataset. In order to run these samples, download the dataset into your S3 bucket. You can find the dataset in Download the MNIST Dataset.
Contents
TrainingJob operator
Training job operators reconcile your specified training job spec to Amazon SageMaker by launching it for you in Amazon SageMaker. You can learn more about Amazon SageMaker training jobs in the Amazon SageMaker CreateTrainingJob API documentation.
Create a TrainingJob Using a Simple YAML File
Download the sample YAML file for training using the following command:
wget https://raw.githubusercontent.com/aws/amazon-sagemaker-operator-for-k8s/master/samples/xgboost-mnist-trainingjob.yaml
Edit the xgboost-mnist-trainingjob.yaml file to replace the roleArn parameter with your <sagemaker-execution-role>, and outputPath with your S3 bucket that the Amazon SageMaker
execution role has write access to. The roleArn must have permissions so that Amazon SageMaker
can access Amazon S3, Amazon CloudWatch, and other services on your
behalf. For more information on creating an Amazon SageMaker
ExecutionRole, see Amazon SageMaker
Roles.
Apply the YAML file using the
following command:
kubectl apply -f xgboost-mnist-trainingjob.yaml
Create a TrainingJob Using a Helm Chart
You can use Helm Charts to run TrainingJobs.
Clone the github repo to get the source using the following command:
git clone https://github.com/aws/amazon-sagemaker-operator-for-k8s.git
Navigate to the amazon-sagemaker-operator-for-k8s/hack/charts/training-jobs/ folder
and edit the values.yaml file to replace values
like rolearn and outputpath with values that correspond to
your account. The RoleARN must have permissions so that Amazon SageMaker
can access Amazon S3, Amazon CloudWatch, and other services on your
behalf. For more information on creating an Amazon SageMaker
ExecutionRole, see Amazon SageMaker
Roles.
Create the Training Job
With the roles and S3 buckets replaced with appropriate values
in values.yaml, you can create a training job using the following
command:
helm install . --generate-name
Your output should look like the following:
NAME: chart-12345678
LAST DEPLOYED: Wed Nov 20 23:35:49 2019
NAMESPACE: default
STATUS: deployed
REVISION: 1
TEST SUITE: None
NOTES:
Thanks for installing the sagemaker-k8s-trainingjob.
Verify Your Training Helm Chart
To verify that the Helm Chart was created successfully, run:
helm ls
Your output should look like the following:
NAME                    NAMESPACE       REVISION        UPDATED                                 STATUS          CHART                           APP VERSION
chart-12345678        default         1               2019-11-20 23:35:49.9136092 +0000 UTC   deployed        sagemaker-k8s-trainingjob-0.1.0
rolebased-12345678    default         1               2019-11-20 23:14:59.6777082 +0000 UTC   deployed        sagemaker-k8s-operator-0.1.0
helm install creates a TrainingJob k8s resource. The operator
launches the actual training job in Amazon SageMaker and updates
the TrainingJob k8s resource to reflect the status of the job in
Amazon SageMaker. You incur charges for Amazon SageMaker resources used
during the duration of your job. You do not incur any charges once your
job completes or stops.
Note: Amazon SageMaker does not allow you to update a running
training job. You cannot edit any parameter and re-apply the
file/config. Either change the metadata name or delete the existing job
and create a new one. Similar to existing training job operators like
TFJob in Kubeflow, update is not supported.
List Training Jobs
Use the following command to list all jobs created using the k8s operator:
kubectl get TrainingJob
The output listing all jobs should look like the following:
kubectl get trainingjobs
NAME                        STATUS       SECONDARY-STATUS   CREATION-TIME          SAGEMAKER-JOB-NAME
xgboost-mnist-from-for-s3   InProgress   Starting           2019-11-20T23:42:35Z   xgboost-mnist-from-for-s3-examplef11eab94e0ed4671d5a8f
A training job continues to be listed after the job has completed or
failed. You can remove a TrainingJob job from the list by
following the Delete a Training Job steps. Jobs that have completed or
stopped do not incur any charges for Amazon SageMaker resources.
Training Job Status Values
The STATUS field can be one of the following values:
CompletedInProgressFailedStoppedStopping
These statuses come directly from the Amazon SageMaker official API documentation.
In addition to the official Amazon SageMaker status, it is possible
for STATUS to be SynchronizingK8sJobWithSageMaker. This
means that the operator has not yet processed the job.
Secondary Status Values
The secondary statuses come directly from the Amazon SageMaker official API documentation. They contain more granular information about the status of the job.
Describe a Training Job
You can get more details about the training job by using
the describe kubectl verb. This is typically used for debugging a
problem or checking the parameters of a training job. To get information
about your training job, use the following command:
kubectl describe trainingjob xgboost-mnist-from-for-s3
The output for your training job should look like the following:
Name:         xgboost-mnist-from-for-s3
Namespace:    default
Labels:       <none>
Annotations:  <none>
API Version:  sagemaker.aws.amazon.com/v1
Kind:         TrainingJob
Metadata:
  Creation Timestamp:  2019-11-20T23:42:35Z
  Finalizers:
    sagemaker-operator-finalizer
  Generation:        2
  Resource Version:  23119
  Self Link:         /apis/sagemaker.aws.amazon.com/v1/namespaces/default/trainingjobs/xgboost-mnist-from-for-s3
  UID:               6d7uiui-0bef-11ea-b94e-0ed467example
Spec:
  Algorithm Specification:
    Training Image:       8256416981234.dkr.ecr.us-east-2.amazonaws.com/xgboost:1
    Training Input Mode:  File
  Hyper Parameters:
    Name:   eta
    Value:  0.2
    Name:   gamma
    Value:  4
    Name:   max_depth
    Value:  5
    Name:   min_child_weight
    Value:  6
    Name:   num_class
    Value:  10
    Name:   num_round
    Value:  10
    Name:   objective
    Value:  multi:softmax
    Name:   silent
    Value:  0
  Input Data Config:
    Channel Name:      train
    Compression Type:  None
    Content Type:      text/csv
    Data Source:
      S 3 Data Source:
        S 3 Data Distribution Type:  FullyReplicated
        S 3 Data Type:               S3Prefix
        S 3 Uri:                     https://s3-us-east-2.amazonaws.com/my-bucket/sagemaker/xgboost-mnist/train/
    Channel Name:                    validation
    Compression Type:                None
    Content Type:                    text/csv
    Data Source:
      S 3 Data Source:
        S 3 Data Distribution Type:  FullyReplicated
        S 3 Data Type:               S3Prefix
        S 3 Uri:                     https://s3-us-east-2.amazonaws.com/my-bucket/sagemaker/xgboost-mnist/validation/
  Output Data Config:
    S 3 Output Path:  s3://my-bucket/sagemaker/xgboost-mnist/xgboost/
  Region:             us-east-2
  Resource Config:
    Instance Count:     1
    Instance Type:      ml.m4.xlarge
    Volume Size In GB:  5
  Role Arn:             arn:aws:iam::12345678910:role/service-role/AmazonSageMaker-ExecutionRole
  Stopping Condition:
    Max Runtime In Seconds:  86400
  Training Job Name:         xgboost-mnist-from-for-s3-6d7fa0af0bef11eab94e0example
Status:
  Cloud Watch Log URL:           https://us-east-2.console.aws.amazon.com/cloudwatch/home?region=us-east-2#logStream:group=/aws/sagemaker/TrainingJobs;prefix=<example>;streamFilter=typeLogStreamPrefix
  Last Check Time:               2019-11-20T23:44:29Z
  Sage Maker Training Job Name:  xgboost-mnist-from-for-s3-6d7fa0af0bef11eab94eexample
  Secondary Status:              Downloading
  Training Job Status:           InProgress
Events:                          <none>
View Logs from Training Jobs
Use the following command to see the logs from the kmeans-mnist
training job:
kubectl smlogs trainingjob xgboost-mnist-from-for-s3
Your output will look similar to the following. The logs from instances are ordered chronologically.
"xgboost-mnist-from-for-s3" has SageMaker TrainingJobName "xgboost-mnist-from-for-s3-123456789" in region "us-east-2", status "InProgress" and secondary status "Starting"
xgboost-mnist-from-for-s3-6d7fa0af0bef11eab94e0ed46example/algo-1-1574293123 2019-11-20 23:45:24.7 +0000 UTC Arguments: train
xgboost-mnist-from-for-s3-6d7fa0af0bef11eab94e0ed46example/algo-1-1574293123 2019-11-20 23:45:24.7 +0000 UTC [2019-11-20:23:45:22:INFO] Running standalone xgboost training.
xgboost-mnist-from-for-s3-6d7fa0af0bef11eab94e0ed46example/algo-1-1574293123 2019-11-20 23:45:24.7 +0000 UTC [2019-11-20:23:45:22:INFO] File size need to be processed in the node: 1122.95mb. Available memory size in the node: 8586.0mb
xgboost-mnist-from-for-s3-6d7fa0af0bef11eab94e0ed46example/algo-1-1574293123 2019-11-20 23:45:24.7 +0000 UTC [2019-11-20:23:45:22:INFO] Determined delimiter of CSV input is ','
xgboost-mnist-from-for-s3-6d7fa0af0bef11eab94e0ed46example/algo-1-1574293123 2019-11-20 23:45:24.7 +0000 UTC [23:45:22] S3DistributionType set as FullyReplicated
Delete Training Jobs
Use the following command to stop a training job on Amazon SageMaker:
kubectl delete trainingjob xgboost-mnist-from-for-s3
This command removes the Amazon SageMaker training job from k8s. This command returns the following output:
trainingjob.sagemaker.aws.amazon.com "xgboost-mnist-from-for-s3" deleted
If the job is still in progress on Amazon SageMaker, the job will stop. You do not incur any charges for Amazon SageMaker resources after your job stops or completes.
Note: Amazon SageMaker does not delete training jobs. Stopped jobs continue to show on the Amazon SageMaker console. The delete command takes about 2 minutes to clean up the resources from Amazon SageMaker.
HyperParameterTuningJobs operator
Hyperparameter tuning job operators reconcile your specified hyperparameter tuning job spec to Amazon SageMaker by launching it in Amazon SageMaker. You can learn more about Amazon SageMaker hyperparameter tuning jobs in the Amazon SageMaker CreateHyperParameterTuningJob API documentation.
Create a HyperParameterTuningJob Using a Simple YAML File
Download the sample YAML file for the hyperparameter tuning job using the following command:
wget https://raw.githubusercontent.com/aws/amazon-sagemaker-operator-for-k8s/master/samples/xgboost-mnist-hpo.yaml
Edit the xgboost-mnist-hpo.yaml file to replace
the roleArn parameter with your <sagemaker-execution-role>. For
HyperparameterTuningJob to succeed, you must also change
the s3InputPath and s3OutputPath to values that correspond
to your account. Apply the updates YAML file using the following
command:
kubectl apply -f xgboost-mnist-hpo.yaml
Create a HyperParameterTuningJob using a Helm Chart
You can use Helm Charts to run HyperParameterTuningJobs.
Clone the github repo to get the source using the following command:
git clone https://github.com/aws/amazon-sagemaker-operator-for-k8s.git
Navigate to the amazon-sagemaker-operator-for-k8s/hack/charts/hyperparameter-tuning-jobs/
folder.
Edit the values.yaml file to replace the roleArn parameter
with your <sagemaker-execution-role>. For HyperparameterTuningJob to
succeed, you must also change the s3InputPath
and s3OutputPath to values that correspond to your account.
Create the HPO Job
With the roles and Amazon S3 paths replaced with appropriate values
in values.yaml, you can create a hyperparameter tuning job using
the following command:
helm install . --generate-name
Your output will look similar to the following:
NAME: chart-1574292948
LAST DEPLOYED: Wed Nov 20 23:35:49 2019
NAMESPACE: default
STATUS: deployed
REVISION: 1
TEST SUITE: None
NOTES:
Thanks for installing the sagemaker-k8s-hyperparametertuningjob.
Verify Chart Installation
To verify that the Helm Chart was created successfully, run the following command:
helm ls
Your output should look like the following:
NAME                    NAMESPACE       REVISION        UPDATED
chart-1474292948        default         1               2019-11-20 23:35:49.9136092 +0000 UTC   deployed        sagemaker-k8s-hyperparametertuningjob-0.1.0                               STATUS          CHART                           APP VERSION
chart-1574292948        default         1               2019-11-20 23:35:49.9136092 +0000 UTC   deployed        sagemaker-k8s-trainingjob-0.1.0
rolebased-1574291698    default         1               2019-11-20 23:14:59.6777082 +0000 UTC   deployed        sagemaker-k8s-operator-0.1.0
helm install creates a HyperParameterTuningJob k8s resource.
The operator launches the actual hyperparameter optimization job in
Amazon SageMaker and updates the HyperParameterTuningJob k8s
resource to reflect the status of the job in Amazon SageMaker. You incur
charges for Amazon SageMaker resources used during the duration of your
job. You do not incur any charges once your job completes or stops.
Note: Amazon SageMaker does not allow you to update a running
hyperparameter tuning job. You cannot edit any parameter and re-apply
the file/config. You must either change the metadata name or delete the
existing job and create a new one. Similar to existing training job
operators like TFJob in Kubeflow, update is not supported.
List Hyperparameter Tuning Jobs
Use the following command to list all jobs created using the k8s operator:
kubectl get hyperparametertuningjob
Your output will look like the following:
NAME         STATUS      CREATION-TIME          COMPLETED   INPROGRESS   ERRORS   STOPPED   BEST-TRAINING-JOB                               SAGEMAKER-JOB-NAME
xgboost-mnist-hpo   Completed   2019-10-17T01:15:52Z   10          0            0        0         xgboostha92f5e3cf07b11e9bf6c06d6-009-4c7a123   xgboostha92f5e3cf07b11e9bf6c123
A hyper parameter tuning job will continue to be listed after the job
has completed or failed. You can remove a hyperparametertuningjob
from the list by following the steps in Delete a Hyper Parameter Tuning
Job. Jobs that have completed or stopped do not incur any charges for
Amazon SageMaker resources.
Hyperparameter Tuning Job Status Values
The STATUS field can be one of the following values:
CompletedInProgressFailedStoppedStopping
These statuses come directly from the Amazon SageMaker official API documentation.
In addition to the official Amazon SageMaker status, it is possible
for STATUS to be SynchronizingK8sJobWithSageMaker. This
means that the operator has not yet processed the job.
Status Counters
The output has several counters,
like COMPLETED and INPROGRESS. These represent how many
training jobs have completed and are in progress, respectively. For more
information about how these are determined,
see TrainingJobStatusCounters in
the Amazon SageMaker API documentation.
Best Training Job
This column contains the name of the TrainingJob that best
optimized the selected metric.
To see a summary of the tuned hyperparameters, run:
kubectl describe hyperparametertuningjob xgboost-mnist-hpo
To see detailed information about the TrainingJob, run:
kubectl describe trainingjobs <job name>
Spawned Training Jobs
You can also track all 10 training jobs in k8s launched by
HyperparameterTuningJob by running the following command:
kubectl get trainingjobs
Describe a Hyperparameter Tuning Job
You can obtain debugging details using the describe kubectl verb
by running the following command.
kubectl describe hyperparametertuningjob xgboost-mnist-hpo
In addition to information about the tuning job, the Amazon SageMaker
Operator for Kubernetes also exposes the best training
job found
by the hyperparameter tuning job in the describe output as
follows:
Name:         xgboost-mnist-hpo
Namespace:    default
Labels:       <none>
Annotations:  kubectl.kubernetes.io/last-applied-configuration:
                {"apiVersion":"sagemaker.aws.amazon.com/v1","kind":"HyperparameterTuningJob","metadata":{"annotations":{},"name":"xgboost-mnist-hpo","namespace":...
API Version:  sagemaker.aws.amazon.com/v1
Kind:         HyperparameterTuningJob
Metadata:
  Creation Timestamp:  2019-10-17T01:15:52Z
  Finalizers:
    sagemaker-operator-finalizer
  Generation:        2
  Resource Version:  8167
  Self Link:         /apis/sagemaker.aws.amazon.com/v1/namespaces/default/hyperparametertuningjobs/xgboost-mnist-hpo
  UID:               a92f5e3c-f07b-11e9-bf6c-06d6f303uidu
Spec:
  Hyper Parameter Tuning Job Config:
    Hyper Parameter Tuning Job Objective:
      Metric Name:  validation:error
      Type:         Minimize
    Parameter Ranges:
      Integer Parameter Ranges:
        Max Value:     20
        Min Value:     10
        Name:          num_round
        Scaling Type:  Linear
    Resource Limits:
      Max Number Of Training Jobs:     10
      Max Parallel Training Jobs:      10
    Strategy:                          Bayesian
    Training Job Early Stopping Type:  Off
  Hyper Parameter Tuning Job Name:     xgboostha92f5e3cf07b11e9bf6c06d6
  Region:                              us-east-2
  Training Job Definition:
    Algorithm Specification:
      Training Image:       12345678910.dkr.ecr.us-east-2.amazonaws.com/xgboost:1
      Training Input Mode:  File
    Input Data Config:
      Channel Name:  train
      Content Type:  text/csv
      Data Source:
        s3DataSource:
          s3DataDistributionType:  FullyReplicated
          s3DataType:              S3Prefix
          s3Uri:                   https://s3-us-east-2.amazonaws.com/my-bucket/sagemaker/xgboost-mnist/train/
      Channel Name:                validation
      Content Type:                text/csv
      Data Source:
        s3DataSource:
          s3DataDistributionType:  FullyReplicated
          s3DataType:              S3Prefix
          s3Uri:                   https://s3-us-east-2.amazonaws.com/my-bucket/sagemaker/xgboost-mnist/validation/
    Output Data Config:
      s3OutputPath:  https://s3-us-east-2.amazonaws.com/my-bucket/sagemaker/xgboost-mnist/xgboost
    Resource Config:
      Instance Count:     1
      Instance Type:      ml.m4.xlarge
      Volume Size In GB:  5
    Role Arn:             arn:aws:iam::123456789012:role/service-role/AmazonSageMaker-ExecutionRole
    Static Hyper Parameters:
      Name:   base_score
      Value:  0.5
      Name:   booster
      Value:  gbtree
      Name:   csv_weights
      Value:  0
      Name:   dsplit
      Value:  row
      Name:   grow_policy
      Value:  depthwise
      Name:   lambda_bias
      Value:  0.0
      Name:   max_bin
      Value:  256
      Name:   max_leaves
      Value:  0
      Name:   normalize_type
      Value:  tree
      Name:   objective
      Value:  reg:linear
      Name:   one_drop
      Value:  0
      Name:   prob_buffer_row
      Value:  1.0
      Name:   process_type
      Value:  default
      Name:   rate_drop
      Value:  0.0
      Name:   refresh_leaf
      Value:  1
      Name:   sample_type
      Value:  uniform
      Name:   scale_pos_weight
      Value:  1.0
      Name:   silent
      Value:  0
      Name:   sketch_eps
      Value:  0.03
      Name:   skip_drop
      Value:  0.0
      Name:   tree_method
      Value:  auto
      Name:   tweedie_variance_power
      Value:  1.5
    Stopping Condition:
      Max Runtime In Seconds:  86400
Status:
  Best Training Job:
    Creation Time:  2019-10-17T01:16:14Z
    Final Hyper Parameter Tuning Job Objective Metric:
      Metric Name:        validation:error
      Value:
    Objective Status:     Succeeded
    Training End Time:    2019-10-17T01:20:24Z
    Training Job Arn:     arn:aws:sagemaker:us-east-2:123456789012:training-job/xgboostha92f5e3cf07b11e9bf6c06d6-009-4sample
    Training Job Name:    xgboostha92f5e3cf07b11e9bf6c06d6-009-4c7a3059
    Training Job Status:  Completed
    Training Start Time:  2019-10-17T01:18:35Z
    Tuned Hyper Parameters:
      Name:                                    num_round
      Value:                                   18
  Hyper Parameter Tuning Job Status:           Completed
  Last Check Time:                             2019-10-17T01:21:01Z
  Sage Maker Hyper Parameter Tuning Job Name:  xgboostha92f5e3cf07b11e9bf6c06d6
  Training Job Status Counters:
    Completed:            10
    In Progress:          0
    Non Retryable Error:  0
    Retryable Error:      0
    Stopped:              0
    Total Error:          0
Events:                   <none>
View Logs from HyperParameterTuning Jobs
Hyperparameter tuning jobs do not have logs, but all training jobs launched by them do have logs. These logs can be accessed as if they were a normal training job. For more information, see View Logs from Training Jobs.
Delete HyperParameterTuning jobs
Use the following command to stop a hyperparameter job in Amazon SageMaker.
kubectl delete hyperparametertuningjob xgboost-mnist-hpo
This command removes the hyperparameter tuning job and associated training jobs from your Kubernetes cluster, as well as stops them in Amazon SageMaker. Jobs that have stopped or completed do not incur any charges for Amazon SageMaker resources. Amazon SageMaker does not delete hyperparameter tuning jobs. Stopped jobs continue to show on the Amazon SageMaker Console.
Your output should look like the following:
hyperparametertuningjob.sagemaker.aws.amazon.com "xgboost-mnist-hpo" deleted
Note: The delete command takes about 2 minutes to clean up the resources from Amazon SageMaker.
BatchTransformJobs operator
Batch transform job operators reconcile your specified batch transform job spec to Amazon SageMaker by launching it in Amazon SageMaker. You can learn more about Amazon SageMaker batch transform job in the Amazon SageMaker CreateTransformJob API documentation.
Create a BatchTransformJob Using a Simple YAML File
Download the sample YAML file for the batch transform job using the following command:
wget https://raw.githubusercontent.com/aws/amazon-sagemaker-operator-for-k8s/master/samples/xgboost-mnist-batchtransform.yaml
Edit the file xgboost-mnist-batchtransform.yaml to change
necessary parameters to replace the inputdataconfig with your
input data and s3OutputPath with your S3 buckets that the Amazon
SageMaker execution role has write access to.
Apply the YAML file using the following command:
kubectl apply -f xgboost-mnist-batchtransform.yaml
Create a BatchTransformJob Using a Helm Chart
You can use Helm Charts to run batch transform jobs.
Get the Helm installer directory
Clone the github repo to get the source using the following command:
git clone https://github.com/aws/amazon-sagemaker-operator-for-k8s.git
Configure the Helm Chart
Navigate to the
amazon-sagemaker-operator-for-k8s/hack/charts/batch-transform-jobs/
folder.
Edit the values.yaml file to replace the inputdataconfig
with your input data and outputPath with your S3 buckets that the Amazon
SageMaker execution role has write access to.
Create a Batch Transform Job
Use the following command to create a batch transform job:
helm install . --generate-name
Your output should look like the following:
NAME: chart-1574292948
LAST DEPLOYED: Wed Nov 20 23:35:49 2019
NAMESPACE: default
STATUS: deployed
REVISION: 1
TEST SUITE: None
NOTES:
Thanks for installing the sagemaker-k8s-batch-transform-job.
To verify that the Helm Chart was created successfully, run the following command:
helm ls
NAME                    NAMESPACE       REVISION        UPDATED                                 STATUS          CHART                           APP VERSION
chart-1474292948        default         1               2019-11-20 23:35:49.9136092 +0000 UTC   deployed        sagemaker-k8s-batchtransformjob-0.1.0
chart-1474292948        default         1               2019-11-20 23:35:49.9136092 +0000 UTC   deployed        sagemaker-k8s-hyperparametertuningjob-0.1.0
chart-1574292948        default         1               2019-11-20 23:35:49.9136092 +0000 UTC   deployed        sagemaker-k8s-trainingjob-0.1.0
rolebased-1574291698    default         1               2019-11-20 23:14:59.6777082 +0000 UTC   deployed        sagemaker-k8s-operator-0.1.0
The previous command creates a BatchTransformJob k8s resource. The
operator launches the actual transform job in Amazon SageMaker and
updates the BatchTransformJob k8s resource to reflect the status
of the job in Amazon SageMaker. You incur charges for Amazon SageMaker
resources used during the duration of your job. You do not incur any
charges once your job completes or stops.
Note: Amazon SageMaker does not allow you to update a running batch
transform job. You cannot edit any parameter and re-apply the
file/config. You must either change the metadata name or delete the
existing job and create a new one. Similar to existing training job
operators like TFJob in Kubeflow, update is not supported.
List Batch Transform Jobs
Use the following command to list all jobs created using the k8s operator:
kubectl get batchtransformjob
Your output should look like the following:
NAME                                STATUS      CREATION-TIME          SAGEMAKER-JOB-NAME
xgboost-mnist-batch-transform       Completed   2019-11-18T03:44:00Z   xgboost-mnist-a88fb19809b511eaac440aa8axgboost
A batch transform job will continue to be listed after the job has
completed or failed. You can remove a hyperparametertuningjob
from the list by following the Delete a Batch Transform Job steps. Jobs
that have completed or stopped do not incur any charges for
Amazon SageMaker resources.
Batch Transform Status Values
The STATUS field can be one of the following values:
CompletedInProgressFailedStoppedStopping
These statuses come directly from the Amazon SageMaker official API documentation.
In addition to the official Amazon SageMaker status, it is possible
for STATUS to be SynchronizingK8sJobWithSageMaker. This
means that the operator has not yet processed the job and will get to it
soon.
Describe a Batch Transform Job
You can obtain debugging details using the describe kubectl verb
by running the following command.
kubectl describe batchtransformjob xgboost-mnist-batch-transform
Your output should look like the following:
Name:         xgboost-mnist-batch-transform
Namespace:    default
Labels:       <none>
Annotations:  kubectl.kubernetes.io/last-applied-configuration:
                {"apiVersion":"sagemaker.aws.amazon.com/v1","kind":"BatchTransformJob","metadata":{"annotations":{},"name":"xgboost-mnist","namespace"...
API Version:  sagemaker.aws.amazon.com/v1
Kind:         BatchTransformJob
Metadata:
  Creation Timestamp:  2019-11-18T03:44:00Z
  Finalizers:
    sagemaker-operator-finalizer
  Generation:        2
  Resource Version:  21990924
  Self Link:         /apis/sagemaker.aws.amazon.com/v1/namespaces/default/batchtransformjobs/xgboost-mnist
  UID:               a88fb198-09b5-11ea-ac44-0aa8a9UIDNUM
Spec:
  Model Name:  TrainingJob-20190814SMJOb-IKEB
  Region:      us-east-1
  Transform Input:
    Content Type:  text/csv
    Data Source:
      S 3 Data Source:
        S 3 Data Type:  S3Prefix
        S 3 Uri:        s3://my-bucket/mnist_kmeans_example/input
  Transform Job Name:   xgboost-mnist-a88fb19809b511eaac440aa8a9SMJOB
  Transform Output:
    S 3 Output Path:  s3://my-bucket/mnist_kmeans_example/output
  Transform Resources:
    Instance Count:  1
    Instance Type:   ml.m4.xlarge
Status:
  Last Check Time:                2019-11-19T22:50:40Z
  Sage Maker Transform Job Name:  xgboost-mnist-a88fb19809b511eaac440aaSMJOB
  Transform Job Status:           Completed
Events:                           <none>
View Logs from Batch Transform Jobs
Use the following command to see the logs from the xgboost-mnist
batch transform job:
kubectl smlogs batchtransformjob xgboost-mnist-batch-transform
Delete a Batch Transform Job
Use the following command to stop a batch transform job in Amazon SageMaker.
kubectl delete batchTransformJob xgboost-mnist-batch-transform
Your output will look like the following:
batchtransformjob.sagemaker.aws.amazon.com "xgboost-mnist" deleted
This command removes the batch transform job from your Kubernetes cluster, as well as stops them in Amazon SageMaker. Jobs that have stopped or completed do not incur any charges for Amazon SageMaker resources. Delete takes about 2 minutes to clean up the resources from Amazon SageMaker.
Note: Amazon SageMaker does not delete batch transform jobs. Stopped jobs continue to show on the Amazon SageMaker console.
Real-time inference
HostingDeployments support creating and deleting an endpoint, as well as updating an existing endpoint. The hosting deployment operator reconciles your specified hosting deployment job spec to Amazon SageMaker by creating models, endpoint-configs and endpoints in Amazon SageMaker. You can learn more about Amazon SageMaker inference in the Amazon SageMaker CreateEndpoint API documentaiton.
Configure a HostingDeployment Resource
Download the sample YAML file for the hosting deployment job using the following command:
wget https://raw.githubusercontent.com/aws/amazon-sagemaker-operator-for-k8s/master/samples/xgboost-mnist-hostingdeployment.yaml
The xgboost-mnist-hostingdeployment.yaml file has the following components that can be edited as required:
ProductionVariants. A production variant is a set of instances serving a single model. Amazon SageMaker will load-balance between all production variants according to set weights.
Models. A model is the containers and execution role ARN necessary to serve a model. It requires at least a single container.
Containers. A container specifies the dataset and serving image. If you are using your own custom algorithm instead of an algorithm provided by Amazon SageMaker, the inference code must meet Amazon SageMaker requirements. For more information, see Using Your Own Algorithms with Amazon SageMaker.
Create a HostingDeployment
To create a HostingDeployment, use kubectl to apply the
file hosting.yaml with the following command:
kubectl apply -f hosting.yaml
Amazon SageMaker create an endpoint with the specified configuration. You incur charges for Amazon SageMaker resources used during the lifetime of your endpoint. You do not incur any charges once your endpoint is deleted.
The creation process will take approximately 10 minutes.
List HostingDeployments
To verify that the HostingDeployment was created, use the following command:
kubectl get hostingdeployments
Your output should look like the following:
NAME           STATUS     SAGEMAKER-ENDPOINT-NAME
host-xgboost   Creating   host-xgboost-def0e83e0d5f11eaaa450aSMLOGS
HostingDeployment Status Values
The status field can be one of several values:
SynchronizingK8sJobWithSageMaker: The operator is preparing to create the endpoint.ReconcilingEndpoint: The operator is creating, updating, or deleting endpoint resources. If the HostingDeployment remains in this state, usekubectl describeto see the reason in theAdditionalfield.OutOfService: Endpoint is not available to take incoming requests.Creating: CreateEndpoint is executing.Updating: UpdateEndpoint or UpdateEndpointWeightsAndCapacities is executing.SystemUpdating: Endpoint is undergoing maintenance and cannot be updated or deleted or re-scaled until it has completed. This maintenance operation does not change any customer-specified values such as VPC config, KMS encryption, model, instance type, or instance count.RollingBack: Endpoint fails to scale up or down or change its variant weight and is in the process of rolling back to its previous configuration. Once the rollback completes, endpoint returns to anInServicestatus. This transitional status only applies to an endpoint that has autoscaling enabled and is undergoing variant weight or capacity changes as part of an UpdateEndpointWeightsAndCapacities call or when the UpdateEndpointWeightsAndCapacities operation is called explicitly.InService: Endpoint is available to process incoming requests.Deleting: DeleteEndpoint is executing.Failed: Endpoint could not be created, updated, or re-scaled. Use DescribeEndpoint:FailureReason for information about the failure. DeleteEndpoint is the only operation that can be performed on a failed endpoint.
Describe a Hostingdeployment
You can obtain debugging details using the describe kubectl verb
by running the following command.
kubectl describe hostingdeployment
Your output should look like the following:
Name:         host-xgboost
Namespace:    default
Labels:       <none>
Annotations:  kubectl.kubernetes.io/last-applied-configuration:
                {"apiVersion":"sagemaker.aws.amazon.com/v1","kind":"HostingDeployment","metadata":{"annotations":{},"name":"host-xgboost","namespace":"def..."
API Version:  sagemaker.aws.amazon.com/v1
Kind:         HostingDeployment
Metadata:
  Creation Timestamp:  2019-11-22T19:40:00Z
  Finalizers:
    sagemaker-operator-finalizer
  Generation:        1
  Resource Version:  4258134
  Self Link:         /apis/sagemaker.aws.amazon.com/v1/namespaces/default/hostingdeployments/host-xgboost
  UID:               def0e83e-0d5f-11ea-aa45-0a3507uiduid
Spec:
  Containers:
    Container Hostname:  xgboost
    Image:               123456789012.dkr.ecr.us-east-2.amazonaws.com/xgboost:latest
    Model Data URL:      s3://my-bucket/inference/xgboost-mnist/model.tar.gz
  Models:
    Containers:
      xgboost
    Execution Role Arn:  arn:aws:iam::123456789012:role/service-role/AmazonSageMaker-ExecutionRole
    Name:                xgboost-model
    Primary Container:   xgboost
  Production Variants:
    Initial Instance Count:  1
    Instance Type:           ml.c5.large
    Model Name:              xgboost-model
    Variant Name:            all-traffic
  Region:                    us-east-2
Status:
  Creation Time:         2019-11-22T19:40:04Z
  Endpoint Arn:          arn:aws:sagemaker:us-east-2:123456789012:endpoint/host-xgboost-def0e83e0d5f11eaaaexample
  Endpoint Config Name:  host-xgboost-1-def0e83e0d5f11e-e08f6c510d5f11eaaa450aexample
  Endpoint Name:         host-xgboost-def0e83e0d5f11eaaa450a350733ba06
  Endpoint Status:       Creating
  Endpoint URL:          https://runtime.sagemaker.us-east-2.amazonaws.com/endpoints/host-xgboost-def0e83e0d5f11eaaaexample/invocations
  Last Check Time:       2019-11-22T19:43:57Z
  Last Modified Time:    2019-11-22T19:40:04Z
  Model Names:
    Name:   xgboost-model
    Value:  xgboost-model-1-def0e83e0d5f11-df5cc9fd0d5f11eaaa450aexample
Events:     <none>
The status field provides more information using the following fields:
Additional: Additional information about the status of the hosting deployment. This field is optional and only gets populated in case of error.Creation Time: When the endpoint was created in Amazon SageMaker.Endpoint ARN: The Amazon SageMaker endpoint ARN.Endpoint Config Name: The Amazon SageMaker name of the endpoint configuration.Endpoint Name: The Amazon SageMaker name of the endpoint.Endpoint Status: The Status of the endpoint.Endpoint URL: The HTTPS URL that can be used to access the endpoint. For more information, see Deploy a Model on Amazon SageMaker Hosting Services.FailureReason: If a create, update, or delete command fails, the cause will be shown here.Last Check Time: The last time the operator checked the status of the endpoint.Last Modified Time: The last time the endpoint was modified.Model Names: A key-value pair of HostingDeployment model names to Amazon SageMaker model names.
Invoking the Endpoint
Once the endpoint status is InService, you can invoke the endpoint
in two ways: using the AWS CLI, which does authentication and URL
request signing, or using an HTTP client like curl. If you use your own
client, you will need to do AWSv4 URL signing and authentication on your
own.
To invoke the endpoint using the AWS CLI, run the following command.
Make sure to replace the Region and endpoint-name with your endpoint’s
Region and Amazon SageMaker endpoint name. This information can be
obtained from the output of kubectl describe.
# Invoke the endpoint with mock input data.
aws sagemaker-runtime invoke-endpoint \
  --region us-east-2 \
  --endpoint-name <endpoint name> \
  --body $(seq 784 | xargs echo | sed 's/ /,/g') \
  >(cat) \
  --content-type text/csv > /dev/null
For example, if your Region were us-east-2 and your endpoint
config name were host-xgboost-f56b6b280d7511ea824b129926example,
then the following command would invoke the endpoint:
aws sagemaker-runtime invoke-endpoint \
  --region us-east-2 \
  --endpoint-name host-xgboost-f56b6b280d7511ea824b1299example \
  --body $(seq 784 | xargs echo | sed 's/ /,/g') \
  >(cat) \
  --content-type text/csv > /dev/null
4.95847082138
Here, 4.95847082138 is the prediction from the model for the mock
data.
Update HostingDeployment
Once a HostingDeployment has a status of InService, it can be
updated. It might take about 10 minutes for HostingDeployment to be in
service. To verify that the status is InService, use the following
command:
kubectl get hostingdeployments
The HostingDeployment can be updated before the status
is InService. The operator will wait until the Amazon SageMaker
endpoint is InService before applying the update.
To apply an update, modify the hosting.yaml file. For example,
change the initialInstanceCount field from 1 to 2 as follows:
apiVersion: sagemaker.aws.amazon.com/v1
kind: HostingDeployment
metadata:
  name: host-xgboost
spec:
    region: us-east-2
    productionVariants:
        - variantName: all-traffic
          modelName: xgboost-model
          initialInstanceCount: 2
          instanceType: ml.c5.large
    models:
        - name: xgboost-model
          executionRoleArn: arn:aws:iam::123456789012:role/service-role/AmazonSageMaker-ExecutionRole
          primaryContainer: xgboost
          containers:
            - xgboost
    containers:
        - containerHostname: xgboost
          modelDataUrl: s3://my-bucket/inference/xgboost-mnist/model.tar.gz
          image: 123456789012.dkr.ecr.us-east-2.amazonaws.com/xgboost:latest
Save the file, then use kubectl to apply your update as follows.
You should see the status change
from InService to ReconcilingEndpoint,
then Updating.
$ kubectl apply -f hosting.yaml
hostingdeployment.sagemaker.aws.amazon.com/host-xgboost configured

$ kubectl get hostingdeployments
NAME           STATUS                SAGEMAKER-ENDPOINT-NAME
host-xgboost   ReconcilingEndpoint   host-xgboost-def0e83e0d5f11eaaa450a350abcdef

$ kubectl get hostingdeployments
NAME           STATUS     SAGEMAKER-ENDPOINT-NAME
host-xgboost   Updating   host-xgboost-def0e83e0d5f11eaaa450a3507abcdef
Amazon SageMaker deploys a new set of instances with your models,
switches traffic to use the new instances, and drains the old instances.
As soon as this process begins, the status becomes Updating. After
the update is complete, your endpoint becomes InService. This
process takes approximately 10 minutes.
Delete the HostingDeployment
Use kubectl to delete a HostingDeployment with the following
command:
kubectl delete hostingdeployments host-xgboost
Your output should look like the following:
hostingdeployment.sagemaker.aws.amazon.com "host-xgboost" deleted
To verify that the hosting deployment has been deleted, use the following command:
kubectl get hostingdeployments
No resources found.
Endpoints that have been deleted do not incur any charges for Amazon SageMaker resources.